Carousel week 1-Art and Design
A1-Evidence
2A
Research: Primary and Secondary Research
2B Skills Learnt
During this week I have learnt many new skills, these ranged from sketching to editing. Not all my skills were successful, In Art and Design during our sketching I found I'm not exactly a great drawer and so I know I need to improve with my sketching through practising. This skill is important in the film industry especially if you are part of the storyboard or design team.
However despite not being great at sketching I found I am quite good at editing, I had already knew how to edit during my GCSEs but I also learnt some new skills during the editing lessons we had this week whilst putting together the clips we filmed from in the induction week. I added in transitions, title, credits and I reversed and slowed down some clips as well, I also added music in the background to add suspense for the film, as we were filming a crime film. This is good for me as I really enjoy editing and I would like to improve even more and so knowing the basics already will really help me learn quicker.
I also really enjoyed doing mono-printing, I hadn't done it before and so it was all new to me. I learnt how you only need a tiny amount of printing ink for this to work and how rubbing my finger over the print create a different effect to the print instead of just using the pencil as an outline. My first image went well as I printed the shell I drew earlier in the day. After we printed it we left it to dry for the day. I also decided to try and print another image this time it was an animals skull. This didn't go as well as my shell as I didn't put in enough details and so it came out quite simple. But overall I feel like my mono printing went well but I could've easily done better.
As part of one of our theory lessons we learnt what Foley's sound is and we even got to make our own. This was a very exciting and creative task as we had to think outside the box on how to make certain sounds. My group used water and rice to recreate a shower sound and used footprints to recreate the noise of someone walking. I really enjoyed this task as it allowed me to get creative with my ideas, Some of the sounds didn't all do that well such as us using a cabbage and knife to try and recreate someone getting stabbed.
2c Processes and Methods taken
A Process is the way in which an action is achieved. I used a process during my Mono-printing lesson as we followed a specific set of instruction to assure we achieved a complete mono-print. The method is the actual instructions we had to follow to get our final product, a mono-printing. The first step we took was to squirt a pea-size amount of black printing ink onto our slab of glass. We then proceeded to use a roller to spread the ink out into a thin square, roughly A4 size. For these steps we had to wear protective gloves so that we didn't get the ink onto our hands as it stains extremely easily and this is also why we had to wear aprons during this lesson. Next we picked out the image we wanted to print. I chose a picture of the shell I had drawn in the lesson beforehand. With some printing paper we taped the chosen picture on top so it didn't move around when we were printing it. We placed the paper on top of the thin square of ink and we had to be careful not to push down on it, otherwise we would ruin the printing. With a pencil we had to draw around the outline on the image which would then print onto the printing paper due to the pressure. To make our print better we could use our fingers to create different textures for shaded areas, which I used for both the mono-prints I did, the shell and an animals skull.
2Ds Discuss the tools that you have used.
All through this week I have used a range of different tools that have helped me create my sketches and my mono-printing.
During my Art lesson I used different types of pens and pencils. I used a pencil, biro, broad fine liner, and a sharpie. Each of these created a different effect when I was drawing. I think that the pencil worked the best and was more effective as I'm more used to sketching in a pencil, where I can erase my drawing, compared to a broad fine liner and sharpie where every mistake has to stay. However during our lesson we were told that we shouldn't erase anything as it adds to the final product. I think this could've been improved if I had picked a slightly easy object to draw and I wasn't too worried about how it turned out as I often wanted to, and sometimes did erase some of my mistakes.
In the mono-printing lesson I used a lot of different tools.
I used a roller, printing ink, scraper, and a solution of washing up liquid and vegetable oil. The roller was used when we were spreading out the printing ink into a thin A4 square. The roller was heavy and so we had to be careful not to knock them onto the floor or drop them as they could've hit our foot. The printing ink was one of the main tools we used as it was the ink we used to make the mono-prints. We had to wear protective gloves and aprons as this ink could easily stain our clothes and hands. After we finished our mono-printings we had to clean up and to clean up we used a scraper and a solution of washing up liquid and vegetable oil which easily helps lift up the printing oil from the glass slab. We squeezed some of the solution onto the glass and with the scraper we began to clean up the black oil. I think if we had longer to do our mono-printings I would've been able to work more on the details to make my prints better but overall the lesson was great as I got to try something new which I thoroughly enjoyed.
 |
| pencil drawing |
 |
| broad fine liner and water |
 |
| sharpie and fine liner |
Research: Primary and Secondary Research
Throughout this week we have been investigating Foley's sound. Foley's sound is the music and noises added during the editing of a product. Foley's Sound is extremely famous in Hollywood in which they are tremendously creative in making the noises and sounds used throughout a film; They use everyday objects such as rice to make the noise of rain. To practise making our own Foley sounds we watched the popular shower scene in psycho however this scene was muted and so we had to carefully watch for any actions that would usually make a noise. We wrote a cue sheet and listed all the sounds we could think of. Then we had to decide how we would recreate each of these sounds. We used rice and running water to recreate the nose of the shower and in the scene the women actually scraped her hand against the back wall of the shower and so we recreated this with a balloon and we rubbed our hand across it making a squeaking noise, one we would think will correspond to the noise in the film clip. This is Primary research as we are taking part in the activity and learning from it rather than watching others experimenting with the task in hand instead.
Another primary source is when we experimented with different materials and Pens during our Art lesson. We had a selection of objects to pick from and with this object we were to redraw it 8 different times, each time using a different method. I chose a Shell. The first two methods we used were a 20 minute sketch with a pencil and then a rough biro sketch in 10 minutes. The next two images were both using a broad fine liner both 10 minutes, With one we got some water and brushed it against the drawing creating a washed away effect. The fifth and sixth drawings we had to hold two pens or pencils together whilst we redrew our object again, I used two pencils the first time and then I used a green sharpie and a black fine liner. The last two were up to us to chose, We had to pick two ways of drawing from the ones we had just practised I chose to do anther image with the broad fine liner and water and then decided to try and draw my shell with my left hand. I think that I didn't do particularly well as I am not the best drawer but I can easily improve by practicing whenever I have any free time and I will gradually be able to grow better at sketching as it is important in media when drawing up storyboards.
My secondary source is during my Art and Design lesson. We walked around and looked at art students work before we started. We then got taught each technique we were using before we had a go ourselves this was so we knew how to do each task so we didn't do anything wrong. Another secondary source is when we edited our filming from our induction week. We had to watch a tutorial video to set up Adobe Premier Pro so we could use it, we also got taught in this video how to keep track of our film clips otherwise we might've lost our filming and our editing may have gone corrupt, but luckily thanks to the tutorial clip none of this happened,
My secondary source is during my Art and Design lesson. We walked around and looked at art students work before we started. We then got taught each technique we were using before we had a go ourselves this was so we knew how to do each task so we didn't do anything wrong. Another secondary source is when we edited our filming from our induction week. We had to watch a tutorial video to set up Adobe Premier Pro so we could use it, we also got taught in this video how to keep track of our film clips otherwise we might've lost our filming and our editing may have gone corrupt, but luckily thanks to the tutorial clip none of this happened,
2B Skills Learnt
During this week I have learnt many new skills, these ranged from sketching to editing. Not all my skills were successful, In Art and Design during our sketching I found I'm not exactly a great drawer and so I know I need to improve with my sketching through practising. This skill is important in the film industry especially if you are part of the storyboard or design team.
However despite not being great at sketching I found I am quite good at editing, I had already knew how to edit during my GCSEs but I also learnt some new skills during the editing lessons we had this week whilst putting together the clips we filmed from in the induction week. I added in transitions, title, credits and I reversed and slowed down some clips as well, I also added music in the background to add suspense for the film, as we were filming a crime film. This is good for me as I really enjoy editing and I would like to improve even more and so knowing the basics already will really help me learn quicker.
I also really enjoyed doing mono-printing, I hadn't done it before and so it was all new to me. I learnt how you only need a tiny amount of printing ink for this to work and how rubbing my finger over the print create a different effect to the print instead of just using the pencil as an outline. My first image went well as I printed the shell I drew earlier in the day. After we printed it we left it to dry for the day. I also decided to try and print another image this time it was an animals skull. This didn't go as well as my shell as I didn't put in enough details and so it came out quite simple. But overall I feel like my mono printing went well but I could've easily done better.
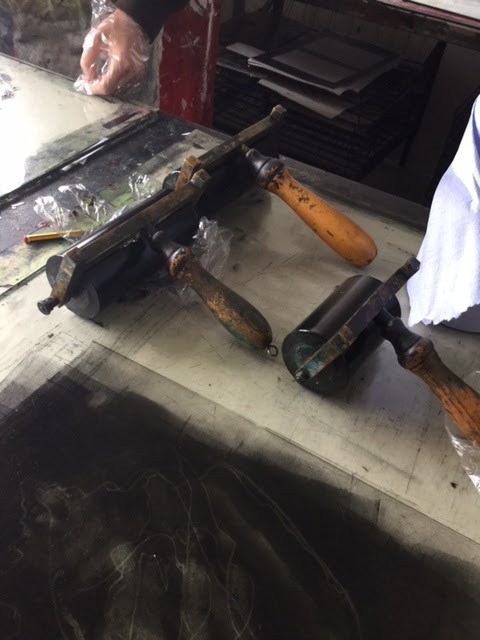
 |
| set up of mono-printing |
2c Processes and Methods taken
 |
| My Animal's Skull mono-print |
2Ds Discuss the tools that you have used.
All through this week I have used a range of different tools that have helped me create my sketches and my mono-printing.
During my Art lesson I used different types of pens and pencils. I used a pencil, biro, broad fine liner, and a sharpie. Each of these created a different effect when I was drawing. I think that the pencil worked the best and was more effective as I'm more used to sketching in a pencil, where I can erase my drawing, compared to a broad fine liner and sharpie where every mistake has to stay. However during our lesson we were told that we shouldn't erase anything as it adds to the final product. I think this could've been improved if I had picked a slightly easy object to draw and I wasn't too worried about how it turned out as I often wanted to, and sometimes did erase some of my mistakes.
 |
| Roller |


Comments
Post a Comment